How to detect the current device size (and how to tell if it's an iPhone 5)
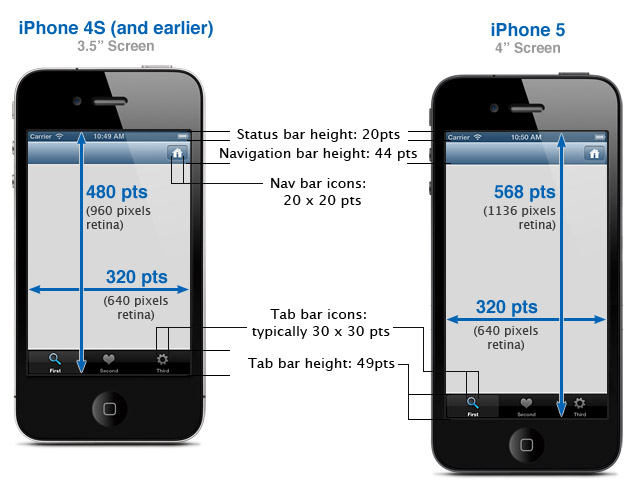
| Element | iPhone 4S (and earlier) | iPhone 5 |
|---|---|---|
| Window (including status bar) | 320 x 480 pts | 320 x 568 pts |
|
Status Bar (How to hide the status bar) |
20 pts | 20 pts |
|
View inside window (visible status bar) |
320 x 460 pts | 320 x 548 pts |
| Navigation Bar | 44 pts | 44 pts |
| Nav Bar/Toolbar Icon | white icon - up to 20 x 20 pts (transparent PNG) | |
| Tab Bar | 49 pts | 49 pts |
| Tab Bar Icon | up to 30 x 30 pts (transparent PNGs) | |
| Text Field | 31 pts | 31 pts |
|
Height of a view inside a navigation bar |
416 pts | 504 pts |
|
Height of a view inside a tab bar |
411 pts | 499 pts |
|
Height of a view inside a navbar and a tab bar |
367 pts | 455 pts |
| Portrait Keyboard (English) | 320 x 216 pts | 320 x 216 pts |
| Landscape Keyboard (English) | 480 x 162 pts | 568 x 162 pts |
|
Launch Image (Launch Image Sizes for iPhone & iPad) |
640 x 960 pixels | 640 x 1136 pixels |
Points vs. Pixels
Apple introduced retina displays starting with the iPhone 4. These have twice as many screen pixels as previous iPhones. You don't have to modify your code to support high-res displays; the iOS coordinate system uses points rather than pixels, so the dimensions and position in points of all UI elements remains the same across all devices.
iOS supports high resolution displays via the scale property on UIScreen, UIView, UIImage, and CALayer classes. If the object is displaying high-resolution content, its scale property is set to 2.0. Otherwise it defaults to 1.0.
Retina GraphicsTo support high-resolution graphics on devices with retina displays, create two versions of the image: a standard size image, and a double-sized image with "@2x" added to the name: |
|
To refer to an image in your code (or in Interface Builder), use the filename of the standard sized image. iOS will automatically detect and use the @2x version if the device supports it:
imageView.image = [UIImage imageNamed:@"button.png"];